Getting Started
We first need to understand how we can develop and execute Python scripts. We are going to use an application called Spyder as our ‘environment’ for connecting with Python.
Objectives
- Be able to run Spyder and understand its role in executing Python scripts.
- Know the key components of the Spyder interface.
The programming process
The process of programming in Python has two main components:
- We write our code into a text editor (similar to how you might write something in Microsoft Word), saving it as a file with a
.pyextension (analysis_script.py, for example). - We then pass this file name to Python, which interprets and executes the code that is contained within the file.
In these lessons, we will be using a program called Spyder as a way of both writing our code and passing it to Python to be executed.
Starting Spyder
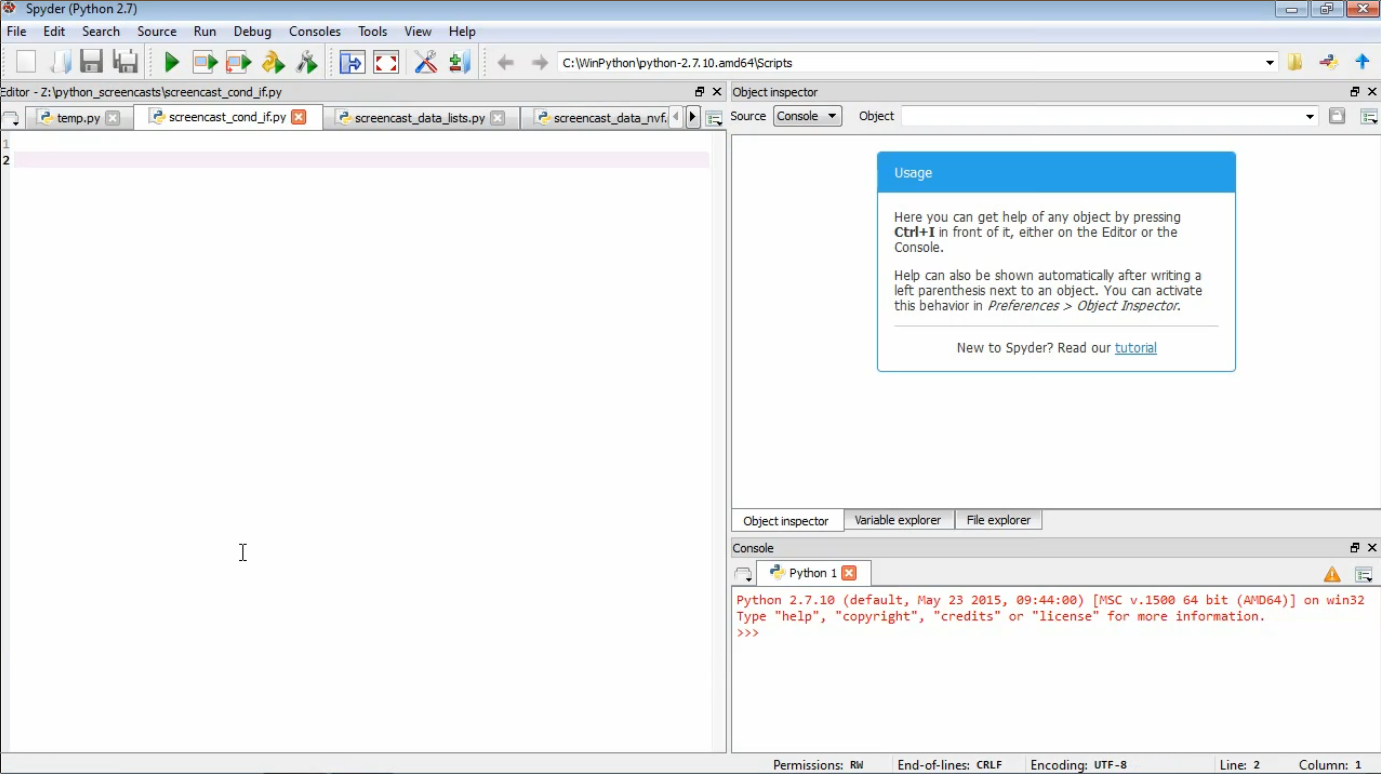
If you are on a computer in the Mathews Building, there will be an icon on the desktop named “Spyder”. Double-click on it to launch the application, which will open a window that looks like that shown below:
If you would like to install Python and spyder on your own computer, see the Appendix at the end of this page.
The Spyder interface
There are four main elements to the Spyder interface to be aware of:
- The editor.
- This is the large vertical pane on the left, with the numbered lines down the side. This is where we will type in our Python commands.
- The help.
- This is the pane on the upper right side. We will use this region to display help with Python commands.
- The “run” button.
- This is the green “play” icon (triangle pointing to the right) on the icon bar towards the top of the screen. We will use this to tell Python to execute our current script.
- The output.
- This is the pane on the lower right side. We will use this to display any output from our Python scripts, and any error messages it may produce.
A first script
Let’s finish by creating our first Python script—one that displays the phrase “Hello, world!” to the output window.
First, create a blank file by clicking File → New or clicking on the new file icon.
Then, click File → Save As.
As we proceed through the lessons, you will need to save your Python code into various files.
Let’s start by creating a directory in which we will save them.
As a suggestion, you may like to create a directory on your Z drive.
When inside the directory, give the current file a name such as hello_world.py and save it.
Now we are ready to create our Python code. To print “Hello, world!” to the output, we type into the editor pane:
print "Hello, world!"
Note
The code that is displayed on these pages, and the code in spyder, will often have different colours. These colours do not mean anything to Python, but are useful for us to highlight certain special words and differentiate different code components.
We then save the file before executing it by clicking on the green arrow icon. If all goes well, this should show the following in the Spyder output window:
Hello, world!
Tip
If you see an error message instead, you may be using Python version 3 rather than Python version 2.
See the SyntaxError section of Dealing with errors for more details on the error.
Summary
The overall objective of this lesson was to introduce you to the Spyder application, which we will use as our environment for developing and executing Python scripts. We looked at how to start Spyder, how it fits in with the process of Python programming, the most important elements of its interface, and we used it to create and run our first script.
Appendix: Installing Python and Spyder on your own computer
For the purposes of this course, we will be assuming that you are using the Python and Spyder environment on the School of Psychology computers. However, all the software that we will be using is free and open-source, so it is possible for you to install and run it on your personal computer.
Which version of Python should be installed
There are two major versions of Python currently in usage—Python 2 (such as 2.7.13) and Python 3 (such as 3.6.0). While the two versions are very similar in most respects, they are not necessarily directly compatible.
The typical recommendation is to use Python 3. However, some of the functionality in these lessons requires external packages that only work with Python 2. Hence, all the code in these pages pertains to Python 2.
Windows
If you’re using Windows, the easiest way is to copy the unsw_psyc_winpython_2016.zip file on the course shared drive to a USB drive, and then extract the contents into the C:\WinPython directory on your computer.
To execute Spyder, navigate to C:\WinPython using Windows Explorer and double-click on Spyder.exe.
Warning
It is important to note that while I have no reason to believe that this software will pose a problem for your computer, you are installing the software at your own risk and I cannot take responsibility for any unexpected effects.
Mac
Installation
If you’re using a Mac, the process is a bit more involved but the following appears to work.
Warning
This will only work on Macs running version 10.7 (‘Lion’) or later—versions 10.6 (‘Snow Leopard’) and earlier will run into an error.
Download “Anaconda” from this link and install into the desired location on your computer.
Open up the Mac terminal. This can be found by either searching for “terminal”, or selecting “Go” from the finder top menu and then “Utilities” and then “Terminal”.
Inside the terminal, execute the following commands in sequence. If asked, press
yto confirm an operation:conda create -n psych python=2.7 anaconda
...wait until it completes, then...
source activate psych
...wait until it completes, then...
conda install wxpython
...wait until it completes, then...
pip install pyglet pygame psychopy
Tip
The above commands must be entered exactly as specified as above, or else it will not be installed correctly.
Launching spyder
After following the above installation process, each time you’d like to launch spyder you need to open a new terminal and execute:
source activate psych
spyder
Setting spyder defaults
Once you’re able to start Spyder, there are some default settings that are worth changing (these are applied automatically to the Windows installation). Open the Preferences window (python → Preferences), and apply the following:
Run:
- Set “Console” to “Execute in a new dedicated Python console”
Editor:
- In the “Code Introspection/Analysis” tab, disable “Automatic code completion”, “Case sensitive code completion”, “Enter key selects completion”, and “Link to object definition”.
- In the “Advanced settings” tab, disable “Automatic insertion of parentheses, braces and brackets” and “Automatic insertion of colons after ‘for’, ‘if’, ‘def’, etc”
Testing psychopy
To test that the installation has worked correctly, start spyder as specified above (i.e. after running source activate psych).
Then, create a new file with the contents:
import psychopy.visual

print "Success"
Then, run the file.
If you see “Success” printed in the output window in the bottom right corner, then it is likely that the installation process went smoothly.
If you see a red error message, likely containing the word ImportError in there somewhere, then something in the installation process went awry.
In the latter case, try the above procedure again, making sure that all the steps are followed precisely.
Using psychopy.gui
To be able to use the functionality in psychopy.gui, we will need to make another change to spyder.
You will know that you need to do this if you see the following error appear:
The program needs access to the screen.
Please run with a Framework build of python, and only when you are
logged in on the main display of your Mac.
The first step is to open a terminal window and run:
source activate psych
which pythonw | xargs tail -n +3
Note
It is important to note that it is pythonw in the above command—i.e. there is a ‘w’ on the end.
On my computer, this produces:
/Users/damien/anaconda/envs/psych/python.app/Contents/MacOS/python "$@"
Highlight and copy everything before the "$@"—so, for me, it would be /Users/damien/anaconda/envs/psych/python.app/Contents/MacOS/python.
Then, start spyder the usual way:
source activate psych
spyder
Inside spyder, open the Preferences window (python → Preferences) and select the “Python interpreter” section.
Select the “Use the following Python interpreter:” option, and paste the output you copied to the clipboard previously.
Press OK, and psychopy.gui should then work fine.
Linux
If you’re using Linux, let me know and we can work out a way to install it.